
Chapter 1: Logging In
1.1 Open the Login Page
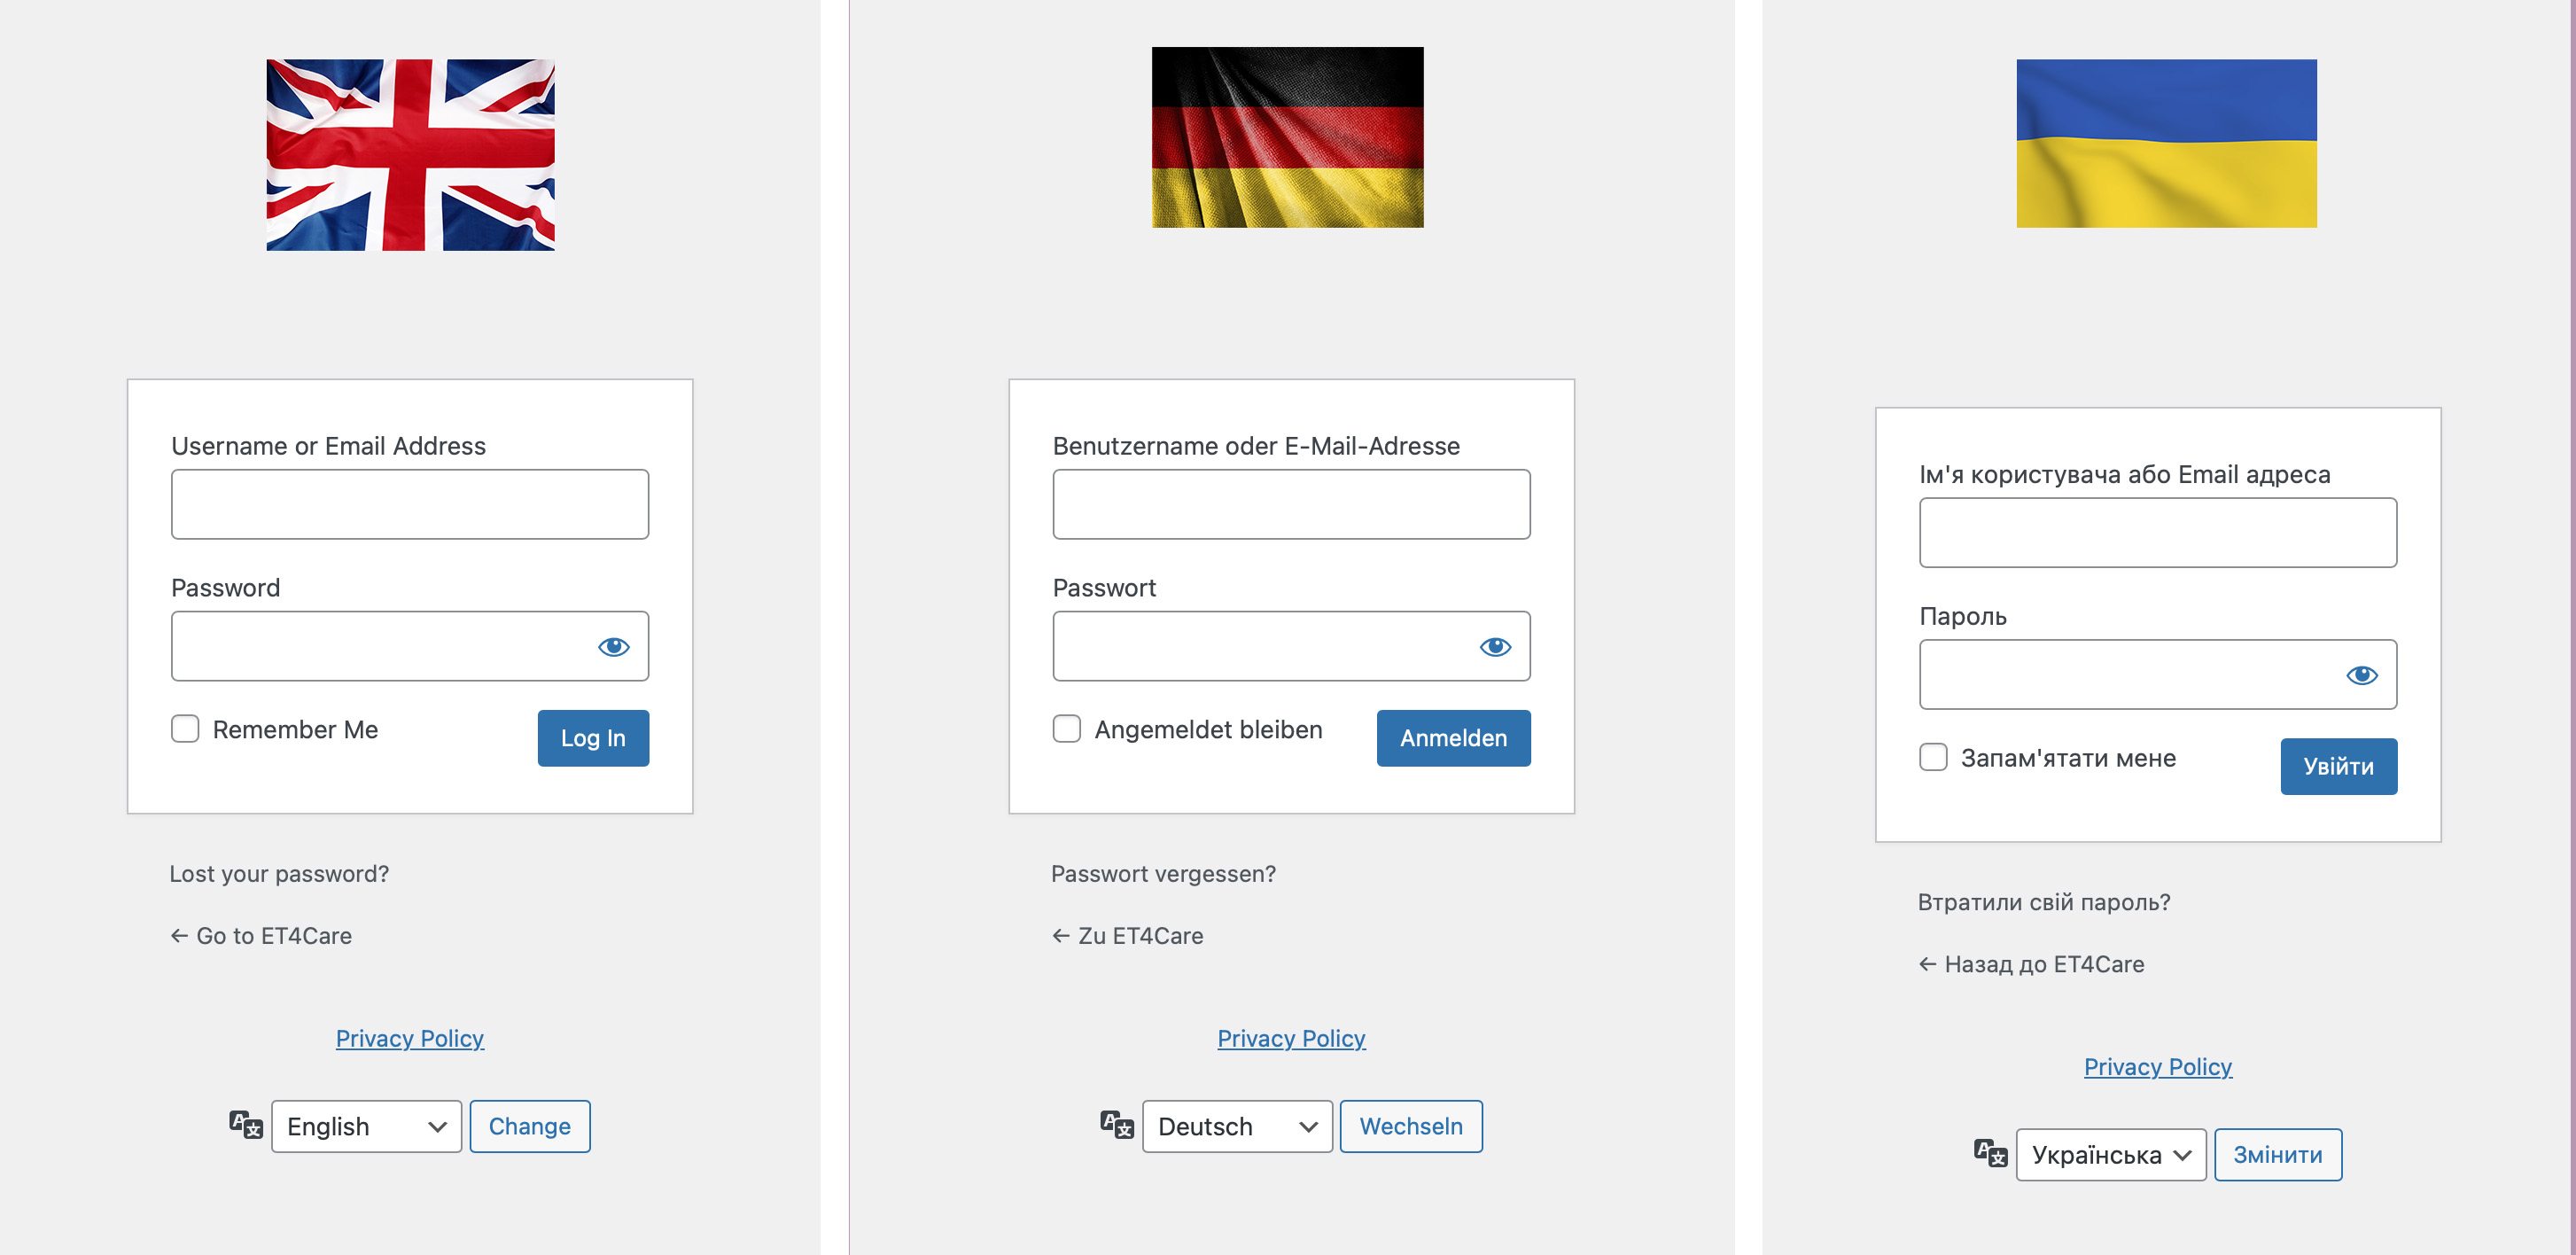
- Open the ET4Care login page in your browser.
- You will see the WordPress login screen with two input fields:
- Username or Email Address
- Password
1.2 Sign In
- Enter your username or email address.
- Enter your password.
- Optional: Check “Remember Me” if you are using your own, secure device.
- Click “Log In”.
Tip: You can briefly show your password using the eye icon in the password field to avoid typing errors.
1.3 Forgot Your Password
If you no longer remember your password:
- Click “Lost your password?” below the login box.
- Follow the instructions (enter your username or email address).
- You will receive an email with a link to set a new password.
Note: If no email arrives, please check your spam/junk folder.
1.4 Change the Language of the Login Page
At the bottom of the page you will find the language selector:
- Open the dropdown (e.g. “Deutsch”).
- Select the desired language (e.g. English).
- Click “Switch”.
This only affects the login interface. The language inside WordPress itself may differ depending on your user profile and settings.
2.2 Open the “Translations” Section
Step 1: Open the “Translations” Menu
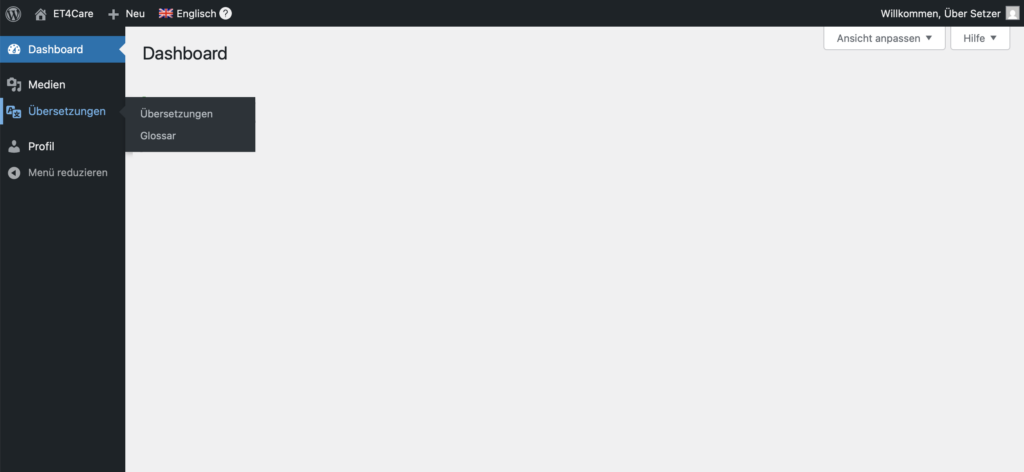
- In the left-hand menu, click “Translations”.
- A submenu opens with two entries:
- Translations (asset & track management)
- Glossary (terms & terminology)
➡️ For actual translation work, select “Translations”.
Step 2: Understand the Asset Overview
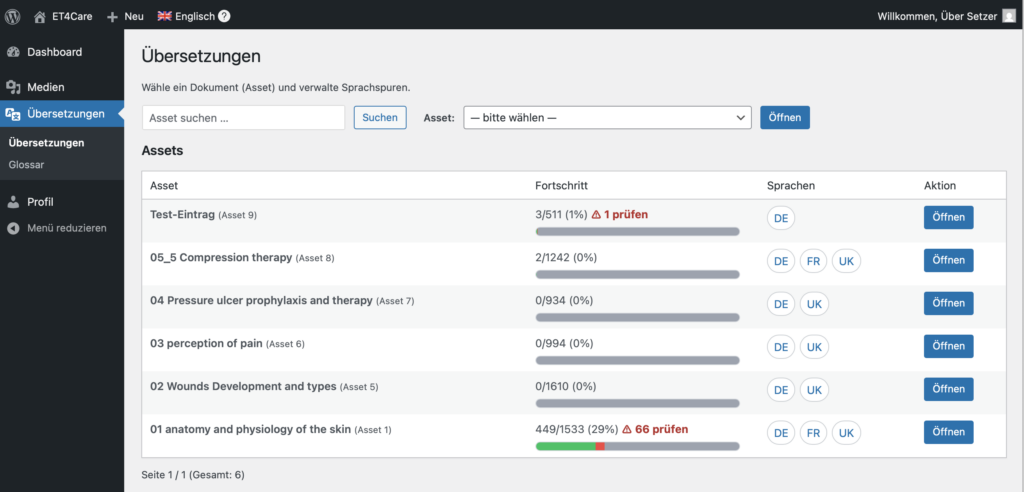
After clicking “Translations”, you will see the asset list.
It contains:
- Asset name (e.g. a course or chapter)
- Progress (e.g. 449/1533 (29%))
- possibly notes such as “66 to review”
- Languages (e.g. DE, FR, UK – shown as round buttons)
- Action → Open
👉 An asset represents a document that is translated into one or more languages.
Step 3: Open an Asset
- Find your asset in the list (or use the search function at the top).
- Click “Open” on the right.
➡️ You will then see:
- the available language tracks,
- their current progress status,
- and you can select a track for editing.
Section 3: Open an Asset & Edit a Language Track
Purpose of This Section
In this section you will learn:
- how to select a language track within an asset,
- how to understand the editing status of a track,
- and how to access the editor.
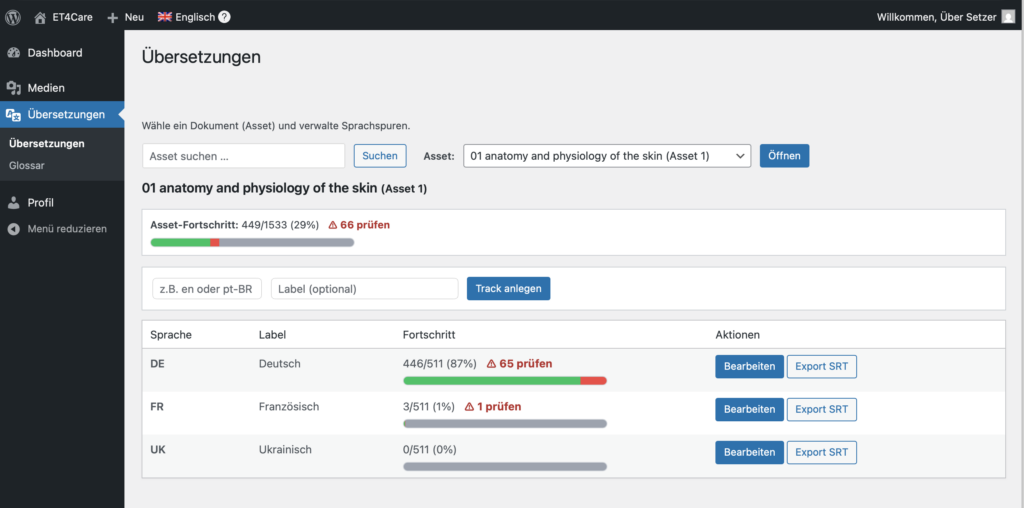
After clicking “Open” in the asset list, you will see the asset detail view.
This view consists of three areas:
1) Asset Information & Overall Progress
At the top you will see:
- the name of the asset (e.g. “01 anatomy and physiology of the skin”)
- the overall asset progress, e.g. 449/1533 (29%)
- possibly a red note such as “66 to review”
Meaning:
- ✔️ Green = translations marked as correct
- ⚠️ Red / “review” = entries marked as incorrect
👉 This allows you to immediately see how much work is still pending.
2) Language Track List
Below is a table showing all available language tracks.
Columns:
- Language (e.g. DE, FR, UK)
- Label (e.g. German, French, Ukrainian)
- Progress per language (e.g. 446/511 (87%))
- Actions
3) Progress Indicator per Track
Each language track has its own progress indicator:
- Green bar → confirmed translations
- Red section → entries marked as “error”
- Gray remainder → not yet edited
Additionally:
- “xx to review” indicates how many text segments still need to be reviewed or corrected.
3.2 Open a Language Track for Editing
Step by Step
- Select the desired language in the table.
- Click “Edit” on the right.
➡️ You will now be taken to the editor for this language track.
3.3 Notes for Translators
- New language tracks are created only by administrators.
- Translators always work within an existing language track.
Section 4: Working in the Track Editor
Purpose of this section
In this section you will learn:
- how the track editor is structured,
- how to edit translations,
- how to correctly use status (OK / review / default),
- how to save and navigate efficiently,
- and which support functions are available to you.
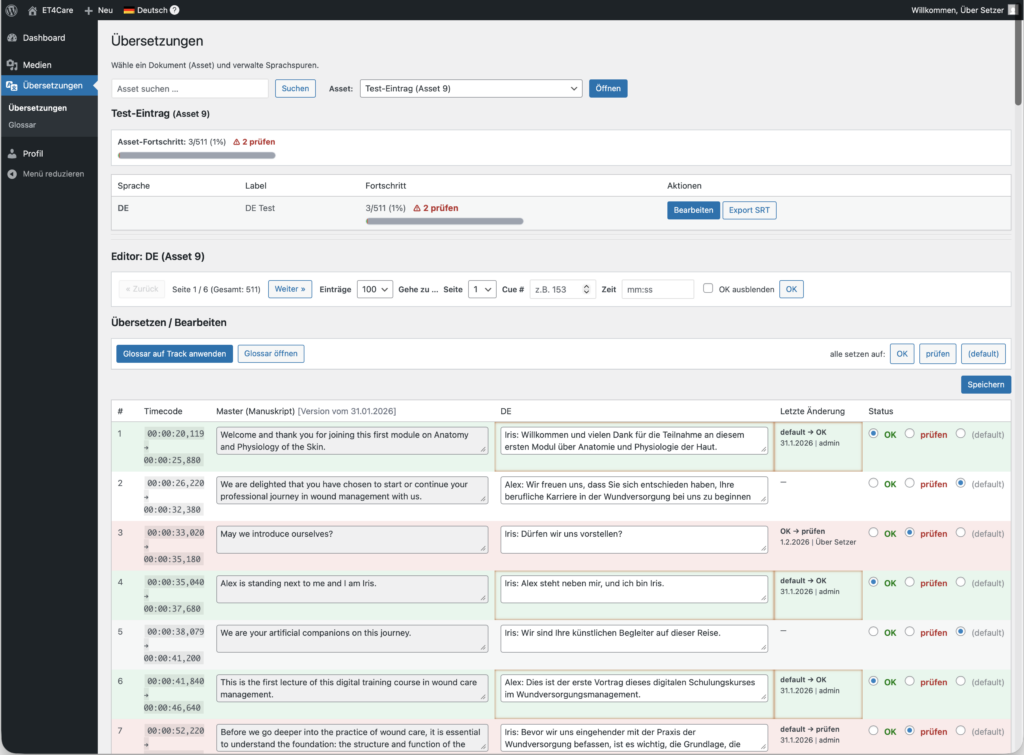
The track editor is organized in a table format.
Each row corresponds to exactly one cue (subtitle entry).
Overview of the columns
| Column | Description |
|---|---|
| # | Sequential number of the cue |
| Timecode | Start and end time of the cue |
| Master (Manuscript) | Original text (not editable) |
| DE / UK / … | Your translation field |
| Last change | Who last edited the entry and when |
| Status | Quality status of the cue |
4.2 Editing a Translation
Translating a cue
- Read the text in the “Master (Manuscript)” column.
- Enter your translation in the text field of the target language column (e.g. DE).
- Pay attention to:
- correct technical terminology,
- consistent spelling,
- clear and understandable language.
👉 The original text cannot be changed.
4.3 Using status correctly (very important)
Each cue has three status options:
✅ OK (green)
- The translation is factually correct
- Language, terminology, and style are correct
- The cue is finished
➡️ Only OK cues fully count toward progress.
⚠️ review (red)
- The translation is incorrect or unclear
- For example:
- terminology is incorrect
- the sentence is unclear
- context is missing or wrong
➡️ This cue still needs revision.
◯ (default)
- The cue has not yet been evaluated
- For example:
- newly imported
- not yet reviewed
- work in progress
Color highlighting
- Green background → status OK
- Red background → status review
- No color → default
4.4 Saving changes
Important
➡️ Changes are only saved when you click “Save”.
- The Save button is located in the upper right corner of the editor.
- The following changes are saved:
- text changes
- status changes
Tip: Save regularly, especially during longer working sessions.
4.5 Navigation in the editor
Above the table you will find several navigation tools:
Page navigation
- Previous / Next → browse through cues page by page
- Entries → number of cues per page (e.g. 100)
Jump directly
- Page → jump directly to a specific page
- Cue # → jump directly to a cue number (e.g. 153)
- Time (mm:ss) → jump to the cue with the corresponding timecode
4.6 Bulk functions (status)
On the right above the table you will find:
- set all to: OK
- set all to: review
- set all to: (default)
👉 These functions apply only to the currently visible page.
Typical usage:
- After initial translation: set all to default
- After review: selectively set individual cues to OK or review
- After QA review: set multiple cues at once
4.7 Working with the glossary
On the left above the table:
🔹 “Apply glossary to track”
- automatically applies the glossary to the entire track
- corrects known terminology, spelling, and variants
🔹 “Open glossary”
- opens the language-specific glossary in a new tab
- there you can:
- look up terms
- suggest or add new entries
➡️ Recommended: Apply the glossary before or after major revisions.
4.8 Best practices for translators
- Set OK only if you have truly reviewed the cue.
- Use review to clearly flag issues.
- Keep terminology consistent (use the glossary!).
- Save regularly.
- Work page by page, not everything at once.
Section 5: Using and maintaining the glossary correctly
Purpose of this section
The glossary ensures that:
- technical terms are always translated consistently,
- typical errors are automatically corrected,
- translators do not have to repeatedly fix the same mistakes manually.
The glossary works per target language and applies globally to all assets and tracks of that language.
5.1 Structure of the glossary

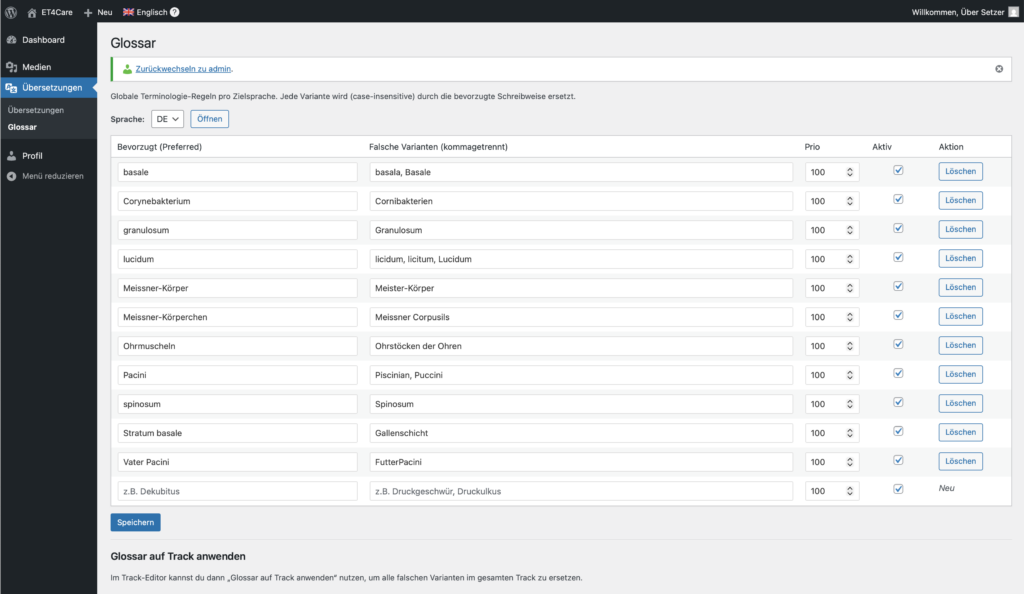
Each row in the glossary represents a terminology rule.
Overview of columns
| Column | Description |
|---|---|
| Preferred | The correct spelling that should be used |
| Incorrect variants | All spellings that are automatically replaced |
| Priority | Order in case of conflicts (lower number = higher priority) |
| Active | Rule is enabled or disabled |
| Action | Delete entry |
5.2 Core principle (very important)
👉 The glossary works on existing translations.
It does not automatically translate from the source language, but instead:
❌ detects incorrect spellings
✔️ replaces them with the preferred spelling
This happens:
- case-insensitive (uppercase/lowercase is ignored)
- as an exact phrase (no partial words)
5.3 Correctly creating a glossary entry
Example (medical terminology)
Goal: All incorrect spellings of Stratum lucidum should be corrected automatically.
How to enter it:
Preferred: Stratum lucidum
Incorrect variants (comma-separated): Stratum Lucidum, Stratum licidum, stratum lucidum
✔️ Result:
- All variants are replaced when applying the glossary
- Always exactly with “Stratum lucidum”
5.4 Language selection
At the top of the glossary, select the target language:
- DE → German glossary
- UK → Ukrainian glossary
- EN → English glossary
- FR → French glossary
👉 Each language has its own glossary. A German entry applies only to German tracks.
5.5 Saving the glossary
- New entries initially appear as “New”
- Click “Save” to:
- create new entries
- apply changes
- confirm activation/deactivation
⚠️ Nothing is applied unless you save.
5.6 Applying the glossary to a track
In the track editor, you will find the button:
🔹 “Apply glossary to track”
This function:
- scans the entire track
- replaces all detected incorrect variants
- always uses the preferred spelling
👉 This is particularly useful:
- after imports
- after major revisions
- before the final quality check
5.7 Best practices for translators
✔️ Add terms that:
- occur frequently
- are medically/technically relevant
- are repeatedly misspelled
✔️ Maintain the glossary continuously, not only at the end.
❌ Do not add full sentences.
❌ Do not use the glossary for stylistic variants.
5.8 Typical workflow (recommended)
- Translate a section
- Add noticeable terms to the glossary
- Save the glossary
- “Apply glossary to track”
- Set status (OK / review)
- Save
Conclusion
With the glossary, you ensure that:
- translations remain consistent
- quality increases without extra effort
- new translators can work correctly more quickly